
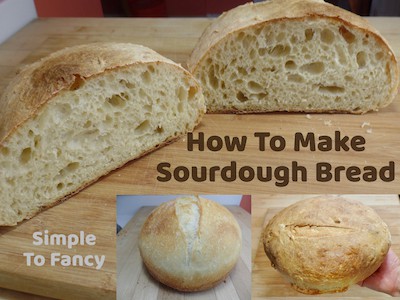
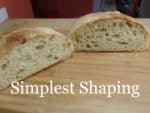
 This rustic sourdough bread recipe shows you all the basics for making the dough and three ways to shape bread. Sourdough is enjoying a rise in popularity as more people discover the health benefits of fermented foods. Sourdough is not a probiotic source like sauerkraut or yogurt since the yeasts and bacteria don’t survive the heat of baking. Still, the acid produced by the fermentation that gives sour dough bread it’s tangy taste is reported to make the minerals in the flour more bioavailable, so we get more nutrients from a slice of artisan sourdough bread than bread made with commercial yeast. And the wild microbes take longer to proof the dough, so the gluten gets more processed and more digestible.
Many gluten sensitive people can actually eat sour dough bread without ill effect. It also has a lower glycemic index minimizing blood sugar spiking. The bacteria and yeast break down the starches (sugars) in the grains, which pre-digests the bread for you. This recipe is for a sourdough bread without yeast, all you’ll need is your sourdough starter, flour, salt and water. Watch the Video demonstration of this recipe.
Making Sourdough Bread Without a Dutch Oven
And did I mention how delicious it is? This is the bread I choose to make most regularly at home, for all of these reasons. And did I mention how easy it is, though it has a reputation for being difficult and finicky to make. As usual, prepping it with the dome makes it all efficient and tidy. So I’m going to show you how to do it and give you a choice of how to shape it for final baking. You can go simple, or basic, or fancy. The beginning steps are all the same. You won’t need a dutch oven unless you want to go fancy. You’ll just need a cookie sheet and some parchment paper for what I call the basic and simple varieties.
I’m creating this post and video in midsummer when the room temperature in my kitchen is over 80° F. The sourdough proofs in about six to seven hours at this temperature, so it’s relatively fast to start a loaf during the day and time it to bake at night when the temperature drops or at least when your other kitchen chores are finished.
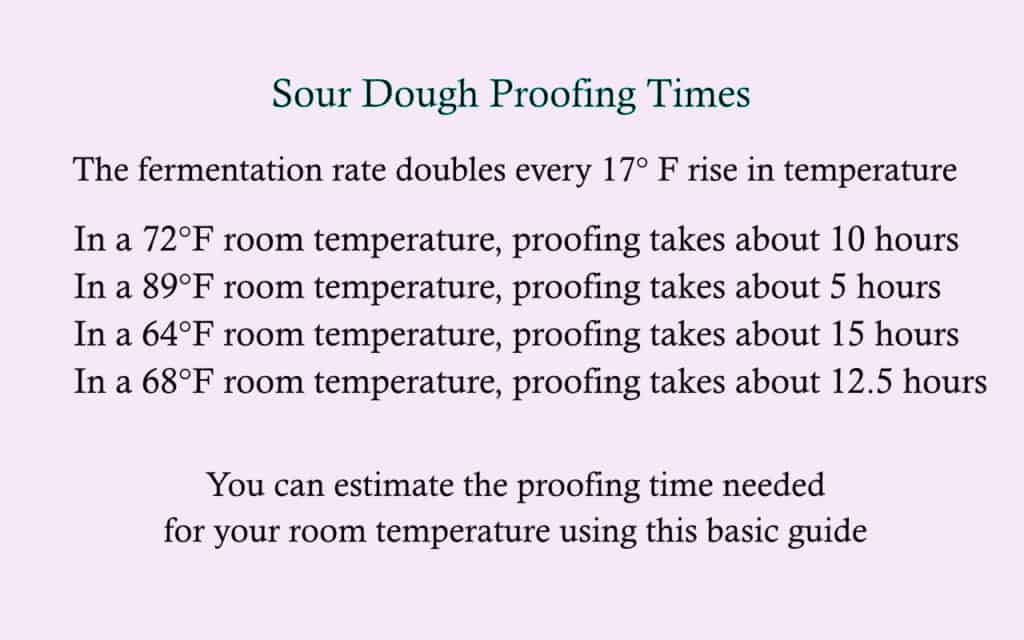
Sourdough Proofing Times
Timing sourdough is usually the trickiest part to plan for, but here’s a general guide. For every 17 degree rise in temperature, the rate of fermentation or proofing doubles. In a room at 72° F, it will take around 10 hours for the sourdough to proof. At 89° F it will take half that time – five hours. At 64° F it will take about 15 hours. You can roughly extrapolate the time for different room temperatures from this brief guide. But also keep in mind that after it’s fully proofed, the final shaping of the dough will deflate it and you’ll need another hour and a half or so for the dough to puff back up to good volume. (This doesn’t apply to the simple version I’m going to show you where you simply scrape the proofed dough onto parchment paper on a cookie sheet, because not that much air escapes the dough in this simple shaping method. So you can bake it immediately after proofing it.)
Sourdough Making Schedule
Given a 72°F room temperature or less and an estimated proofing time of 10 hours or more, it often makes sense to start the sourdough bread in the evening or night and allow it to proof overnight. I plan to do a future post about the different ways you can warm dough and accelerate proofing using incandescent light bulbs. But if you’re interested now, you can look at the warming setup I show in my Thin Crust Pizza post.
Thicken Up the Sourdough Starter
The other thing to know before starting is about the hydration percentage of the sourdough starter. If your starter is quite liquid, it will affect the overall hydration percentage of the dough and will probably make the final dough a little too sticky for easy shaping. The recipe that follows calls for 12 oz of water to 16 oz (1 lb) of flour by weight. That gives us a 75% hydration rate. It’s best to have your sourdough starter closer to 75% hydration too, though it doesn’t have to be exact, just pretty thick. I give directions on how to make a sourdough starter and how to store it and use it in recipes in the very next post, but let’s get on to the recipe.
Watch the Video demonstration of this recipe.
Ingredients
12 oz (1½) cups of water
.30 oz of salt (1½ tsp)
4.25 oz of sour dough starter (½ cup)
16 oz of all purpose flour (3 1/3 cups)
Directions
1. A few hours ahead of time, take your sourdough starter out of the refrigerator and add enough flour to make it a fairly thick mixture. (If you’ve been keeping it in your refrigerator at a 1:1 ratio of water to flour by volume, for instance, ¼ cup of flour to ¼ of water, you will need to add a couple of tablespoons of flour to thicken it up. If your starter is already thick, just give it a sprinkle of flour to activate it.) Make sure you will have enough starter to measure out ½ cup or 4.25 oz.
2. Add the water, sourdough starter, and salt to a mixing bowl. Stir it all well.
3. Stir in the flour until consistently moistened. Scrape in all the flour that clings to the bowl. You can substitute some whole wheat flour if you choose, but add about 2 tsp of water for every cup of whole wheat flour you substitute.
4. Next autolyse the dough by allowing the mixture to sit for 15 to 20 minutes.
5. Knead by spreading the dough with the dome to stretch and align the gluten and give it the elasticity that will allow it to hold a good shape. Turn the bowl so the spreading is done in all directions. Do this about a fifteen times.
6. Cover the dough with plastic wrap or a beeswax cover to keep the dough from forming a skin. Start the proofing process by setting the dough in a warm place.
7. The dough should be stretched and folded 3 times during the proofing process. The 3 sessions don’t have to be evenly spaced in time. Through my experimentation, I’ve discovered that it’s not so critical when these are done. If you’re leaving the dough to proof overnight, do at least one stretch and fold session before you leave it for the night. Also have at least 30 minutes between stretch and folds and maybe even 45 minutes if the room temperature is cold. Also, if you want to have the bread ready as soon as possible, don’t wait too close to the end of your estimated proofing time to do the third stretch and fold. The dough always has to recover volume after each stretch and fold, so you might have to wait unnecessarily long for the dough to catch up.
8. To stretch and fold, scoop under a section of the dough with the dome to pull it up and stretch it over itself. Work around in a circle, pulling on the dough and stretching it over itself, piling the dough high. Then cover with plastic wrap again to continue the proofing process. This encourages the gluten to make more new bonds to help it stack up in volume.
9. When the dough is big and bubbly and doubled in volume, it’s time to shape it for baking. I’m going to describe three different ways to choose from.
Shaping Sourdough Bread
Basic Hand Shaping Sourdough Bread
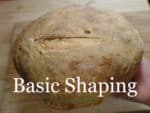 The benefit of this choice is the simplicity of just baking this rustic sourdough bread on a cookie sheet and not having to worry about the dough sticking to the inside of a dutch oven, not to mention having to buy a dutch oven or a banneton proofing basket. The drawback is that it doesn’t always rise and bake into a perfectly neat shape. It takes some practice with the dough tensioning step to make perfect looking loaves, but try it. It’s not that difficult to make a good looking loaf.
1. To shape the dough, scrape it out of the bowl onto a well-floured surface, dust your hands with flour and begin to shape it into a ball. You take a section of dough and fold it over toward the center and then working in a circle, take another section and fold it over toward the center, continuing until a ball is formed.
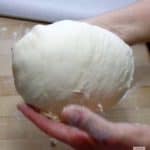 2. To ensure good oven spring, create tension on the top surface of the dough ball. You hold the dough ball in your hands and gently pull the surface dough underneath to stretch and tighten the top. This tension makes the surface dough like an elastic band that can expand with oven heat but still hold a good boule shape. You’ll need flour on your hands to make this work.
3. Take a cookie sheet or other shallow baking pan and dust it with a ten inch circle of cornmeal, oatmeal or bran, or place some parchment paper on it. Place the dough ball top-side-up on the cornmeal, etc. to rise until doubled in volume. This will take about an hour and a half in a 68° – 70°F room.
4. When you sense the dough is close to double the volume, preheat the oven to 450°F.
5. Slash the loaf with a sharp serrated knife to vent the dough.
6. Bake the loaf at 450° F for 40 to 45 minutes until golden brown.
7. Cool a couple of hours before cutting the loaf.
Baking Rustic Sourdough Bread in a Dutch Oven – the Fancy Option
 The benefit of this method is the perfectly round shape of the loaf from rising and baking in the circular pot. The drawback is that the dough can stick to the inside of the pot and when it does, you have to chisel it out. To avoid this, use enough parchment paper to cover not only the bottom of the dutch oven, but line the sides of the pot a few inches up as well.
1. Take out your dutch oven and coat the bottom of it with cornmeal, oatmeal, bran or parchment paper.
2. To shape the dough, scrape the dough onto a well-floured surface, dust your hands with flour and begin to shape it into a ball. You take a section of dough and fold it over toward the center and then working in a circle, take another section and fold it over toward the center, continuing until a ball is formed.
3. To ensure good oven spring, create tension on the top surface of the dough ball. You hold the dough ball in your hands and gently pull the surface dough underneath to stretch and tighten the top. This tension makes the surface dough like an elastic band that can expand with oven heat but still hold a good boule shape.
4. Place the dough top-side-up on the cornmeal or parchment paper in the center of the pot. Let it rise until doubled in volume.
5. When it has recovered its volume, slash the loaf with a sharp serrated knife. Put the lid on the pot and place it in the middle of your unheated oven. Set the temperature to 450° F and begin to bake the bread.
6. Bake for 40 minutes with the lid on and an additional 15 or so minutes with the lid off until golden brown.
7. Cool a couple of hours before cutting the loaf.
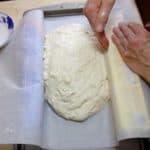
Quickest Easiest Shaping of Rustic Sourdough Bread
 The benefit of this method is the ease of just scraping the dough from the bowl onto parchment paper on a cookie sheet. It won’t stick to anything. You won’t have to wait for the dough to regain its volume and can bake it right away. And it tends to have more of those appealing air holes that people like to see in sourdough bread. The other methods of shaping, where you’re forming a ball of dough, tend to compress it and eliminate more of the air pockets that formed during proofing. The drawback is that the loaves have an irregular and flatter shape. We can help the shape a bit by confining the dough on the cookie sheet with the aid of two or three oblong boxes, like the kind that plastic and foil wraps come in. You can make a longer, narrower loaf if you use three boxes — two of them right next to one another. The third against the other edge of the cookie sheet.
1. Preheat your oven to 450° F.
2. Take out a cookie sheet and tear off a generous piece of parchment paper.
3. Place at least two oblong boxes on the cookie sheet at the long side edges. Cover these with the sheet of parchment paper. Make sure there’s plenty of parchment paper overhanging the margins of the boxes. The paper is likely to shift once the dough lands on it.
3. Scrape the dough out of the bowl onto the paper in the gap between the boxes. Try to pile it high rather than spread out.
 4. You can correct the shape with wet fingers to smooth it out, if needed.
5. Bake the loaf at 450° F for 40 to 45 minutes until golden brown.
6.. Cool a couple of hours before cutting the loaf.
Watch my Video demonstration of this recipe.
Subscribe to this blog for more delicious recipes and videos
Learn more about the Dome Dough Maker