
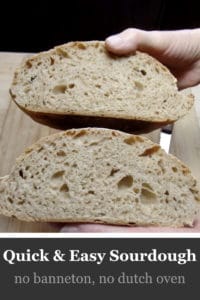
 This easy sourdough recipe can be made by just about anyone. I think it’s the fastest, simplest way ever to make a delicious, high rising loaf with a very open crumb. It’s a sourdough without yeast added to it. Flour, salt, water and wild yeast from a bread starter, and that’s all. It can be made with all purpose flour, bread flour or a portion of whole wheat flour.
A Simple Sourdough Recipe
I’ve made many loaves of sourdough bread over the years and know that it’s possible to fuss over many of the steps in trying to make the perfect-looking loaf. Personally, I find the fuss of a precision sourdough recipe totally unnecessary. Because here is a streamlined recipe that requires very few steps, very little work, and very little skill. I think of it as everyday sourdough bread. It might not win a prize for looks, but it sure is delicious, rises high, and once sliced, looks as good as any other sourdough slices. So if you’re a busy person and you want a simple recipe, this is it. It’s a no banneton proofing basket, no dutch oven recipe. I’ve come up with a completely unique and simple way to shape sourdough. If you want to make a more polished-looking loaf, check my earlier sourdough recipe that shows three different ways to shape a loaf from simple to fancy.
Make Your Own Sourdough Starter
If you don’t have a sourdough starter, you can easily make your own by following my post on making and maintaining a sourdough starter. It takes very little work to create a starter but needs a few minutes a day to feed it while it ferments for about a week.
Click to view my 6 minute video demonstration of this recipe.
Easy Sourdough Recipe
Ingredients
- 12 oz water 1½ cups
- 4.25 oz sourdough starter ½ cup
- .30 oz salt 1½ tsp
- 16 oz all purpose flour 3 1/3 cups
Instructions
- A few hours ahead of time, take your sourdough starter out of the refrigerator and add enough flour to make it a fairly thick mixture. (If you’ve been keeping your starter in the refrigerator at a 1:1 ratio of water to flour by volume, for instance, ¼ cup of water to ¼ of flour, you will need to add a few tablespoons of flour to thicken it up. If your starter is already thick, just give it a sprinkle of flour to activate it.) Make sure you will have enough starter to measure out ½ cup or 4.25 oz.
- Add the water, sourdough starter, and salt to a mixing bowl. Stir it all well.
- Stir in the flour until consistently moistened. Scrape in all the flour that clings to the bowl. You can substitute some whole wheat flour if you choose, but add about ½ oz or 2 tsp of water for every cup of whole wheat flour you substitute.
- Next autolyse the dough by allowing the mixture to sit for 15 to 20 minutes. This resting period would be a good time to replenish the flour and water in your sourdough starter. I recommend storing it in a 1 to 1 ratio of flour and water and refrigerating it for the next use. Your sourdough starter can last your lifetime if cared for well.
- Knead by spreading the dough in the bowl to stretch and align the gluten and give it the elasticity that will allow it to hold a good shape. Spread in one direction and turn the bowl so the spreading is done radially. Knead with the dome for best results. Do about fifteen to twenty strokes.
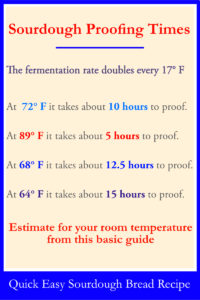
- Cover the dough with plastic wrap or a beeswax cover to keep the dough from forming a skin. Start the proofing process by setting the dough in the warmest place in your house. Sourdough takes a while to proof, especially when the house is cold. In a 72 degree room temperature it takes about 10 hours to proof. So it’s possible to prep it in the morning and bake it in the evening. But if your house is colder, it usually works better to prep it in the evening and let it proof overnight. You can double the recipe and since you won’t need a banneton or dutch oven for this recipe, you can bake two loaves at once. Use this timing chart to help you figure out the best schedule for yourself.
- The dough should be stretched and folded 3 times during the proofing process. The 3 sessions don’t have to be evenly spaced in time. Through my experimentation, I’ve discovered that it’s not so critical when these are done. But allow at least 30 minutes between stretch and folds and maybe even 45 minutes if the room temperature is cold. Also, if you want to have the bread ready as soon as possible, don’t wait too close to the end of your estimated proofing time to do the third stretch and fold. The dough always has to recover volume after each stretch and fold, so you might have to wait unnecessarily long for the dough to catch up.To stretch and fold, scoop under a section of the dough with the dome to pull it up and stretch it over itself. Work around in a circle, pulling on the dough and stretching it over itself, piling the dough high. Then cover with plastic wrap again to continue the proofing process. This encourages the gluten to make more new bonds to help it build volume.
- When the dough is big and bubbly and doubled in volume, it’s time to shape it for baking. At this time, preheat your oven to 450° F.
- Take out a cookie sheet and tear off a generous piece of parchment paper. Place three oblong boxes (like the one the parchment paper comes in plus two other wrap boxes) on the cookie sheet at the long side edges; two boxes on one side and one box on the other side of the pan leaving a gap between the boxes to receive the dough. Cover these with the sheet of parchment paper. Make sure there’s plenty of parchment paper overhanging the margins of the boxes. The paper is likely to shift once the dough lands on it.
- Scrape the dough out of the bowl onto the paper in the gap between the boxes. You can smooth the shape a bit with wet fingers if you’d like and bake it right away. Or you can let the dough rest between the boxes for another hour or so to rise more so the dough smooths out a bit.

- To get ready for baking, slash the loaf with a sharp serrated knife along the length of the dough a little to the side. Then trim the paper with scissors and remove the boxes. If baking two loaves, lift one by gripping the parchment paper and placing it next to the other loaf on one cookie sheet.
- Bake at 450° F for 35 minutes until golden brown. It may take more time to bake two loaves at once. Cool a couple of hours before cutting.
Watch my Video demonstration of this recipe.
Subscribe to this Domestic Bliss blog for more delicious recipes and videos.
Learn more about the Dome Dough Maker