High Hydration Bread Dough
Are You a Baker or Would You Like to Be?
This guide will introduce you to the best, most convenient methods for baking bread at home because bread making has evolved in recent years and there are new techniques to learn. The biggest new trend in bread baking is the addition of more water in bread dough recipes. It’s called high hydration bread making and this practice overall makes bread making easier with better, higher rising bread results. Making bread less dense can be easier and more successful if we understand what happens in the natural process of gluten formation.
 High Hydration Dough
Now that food scientists have taken a peek at what’s really happening inside fermenting dough, we can use their discoveries to make better, easy homemade bread. There are even high magnification images of dough at various stages of development that we can look up online. It turns out that using more water when making bread at home is a very simple way to help bread rise better and reduce preparation time. Higher hydration enhances the development of the gluten network in bread. It’s just easier for gluten proteins to freely move around and knit together when they’re wetter and more flexible.
Gluten Development
Bread rises because this elastic gluten network is able to capture gases given off when yeast break down the flour. It takes these two different processes to make bread: 1. gluten network formation and 2. fermentation by yeast. Both of these processes happen naturally, but we can refine our methods to help them along so they work better for us and make it easier and more convenient too. I’ve been experimenting a lot lately to see how I can make the best bread with the least amount of fuss. I prefer recipes to be streamlined and convenient — easy to fit into my typically busy days. And if you also prefer to make bread with less time and work, read on.
How to Make a Boule
In my experimentation, I’ve been working with the same recipe for a white flour boule but varying different preparation steps to see which steps are really worth doing. After all, you can make bread by simply stirring all your ingredients together and waiting about 24 hours for the dough to have enough structure to form a good loaf all by itself — this is called no-knead bread, it’s the simplest way to make bread, but for me, it’s too inconvenient to wait 24 hours when I could be eating slices in as little as 3 hours for so many different kinds of bread with only very little kneading. Boules are a great loaf shape to test because dough has a tendency to spread and flatten out with gravity, so you want strong dough with enough elasticity to keep a shape. Loaves that are baked in pans are constrained to maintain their shapes, so it’s harder to tell whether they have that strength. So what I’m really testing with my boule making is whether the protein architecture is making an elastic dough with enough dough strength to hold together, hold a shape, and hold in air. This architecture of the dough is built by gluten and it’s been helpful to know how gluten forms.
The second process — fermentation — called proofing bread or proving bread happens when starches in the flour are consumed by yeast and bacteria. Fermentation provides the gases that fill the elastic gluten architecture and raise the dough’s volume. You need both systems to make bread. And we can use methods that optimize these two processes to more easily turn out great results. In this post, I’m going to focus on gluten formation. I’ll post about the yeast fermentation process in a future post.
Boules are a great loaf shape to test because dough has a tendency to spread and flatten out with gravity, so you want strong dough with enough elasticity to keep a shape. Loaves that are baked in pans are constrained to maintain their shapes, so it’s harder to tell whether they have that strength. So what I’m really testing with my boule making is whether the protein architecture is making an elastic dough with enough dough strength to hold together, hold a shape, and hold in air. This architecture of the dough is built by gluten and it’s been helpful to know how gluten forms.
The second process — fermentation — called proofing bread or proving bread happens when starches in the flour are consumed by yeast and bacteria. Fermentation provides the gases that fill the elastic gluten architecture and raise the dough’s volume. You need both systems to make bread. And we can use methods that optimize these two processes to more easily turn out great results. In this post, I’m going to focus on gluten formation. I’ll post about the yeast fermentation process in a future post.
What Does Gluten Do?
So what about gluten formation and what is gluten? It’s a protein that forms in the wheat flour when you mix it with water — hydrate it. Gluten comes about when two proteins in the flour, glutenin and gliadin are unlocked by water and able to move flexibly and freely. These proteins interact and start to stick to one another forming bonds with one another. This is the way gluten forms from these precursor proteins. The protein chains form cross links, and stirring them forms even more cross links until a network of cross links is created — the gluten network. With kneading, the proteins stretch and align in the direction of the kneading and even more cross links form to eventually create gluten sheets that are elastic and extensible (stretchy) and able to hold air. And the gluten becomes even stronger as more bonds form. Dough strength is needed for keeping a shape in the dough. 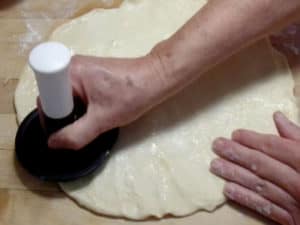 But you can have too much strength and make the dough too elastic, having too much ability to snap back and not enough ability to stretch. This ability to stretch is called dough extensibility. When you’re stretching out pizza dough, extensibility is a must.
Kneading Bread Dough
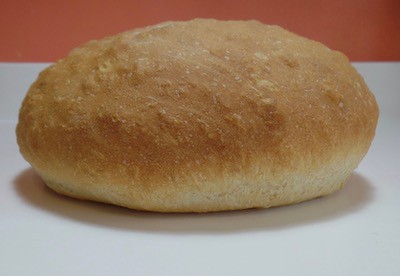
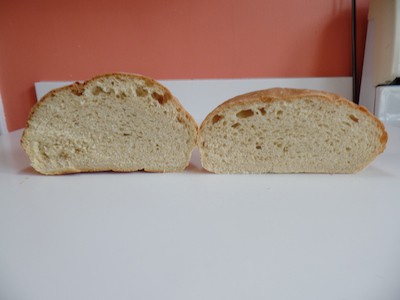
But it all gets going with water — and higher water content enhances the building of the gluten structure so bread rises higher and has a more open crumb with less kneading by hand or by machine. Actually, you don’t need a machine at all to make great bread dough, because wetter dough doesn’t require much kneading at all, though some kneading definitely helps to create sheets of gluten that hold air better.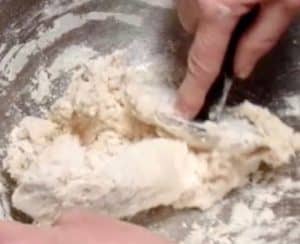 A higher water content — higher than what was traditionally used — does make hand kneading more difficult, because wetter dough is sticky dough and it gets stuck to surfaces and is kind of messy. You can be tempted to add more flour to be able to hand knead at all, which defeats the purpose. Compare the results of these two boules I baked. The one on the bottom was hand kneaded for 10 minutes, but in order to do it, I had to add a couple of tablespoons of flour, so it didn’t rise as well as the bread on the top which was kneaded with the dome for one minute.
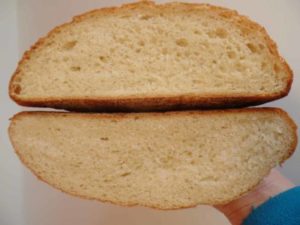
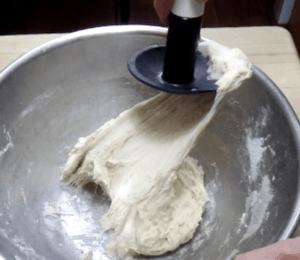
So this tool I invented — the Dome Dough Maker — has been my best bread making discovery. It’s so very easy to knead moist dough with the dome and it happens very quickly, in a minute or less. And it’s conducive to making sheets of gluten fibers because you align a wide swath of dough with each push radially in a bowl.
More about the Dome here.
Water to Flour Ratio in Bread Dough
So how much moisture is good? I typically use a water weight to flour weight ratio of 65% to 75%. In traditional bread recipes the ratio would be closer to 55% to 60%. I’ve had very good results with higher ratios and many of the recipes you will find in my blog are for 12 oz of water to 16 oz (1 lb.) of all purpose flour – 75% hydration. This ratio makes a nice open crumb and a boule that rises and adheres well. Higher moisture while baking also turns into steam, which gives additional lift to the bread through oven spring.
Next I’ll show you the results of my experimentation with different preparation methods of high hydration bread. Following them will give you a good foundation in how to make great bread at home for twenty-first century lifestyles. The tested recipe and techniques for these doughs will be posted on my blog.
Autolyse Dough
So one method to optimize gluten development is autolysing, which is an initial step where you mix the water and flour together until consistently moistened and then let the mixture rest for 15 or 20 minutes before kneading. 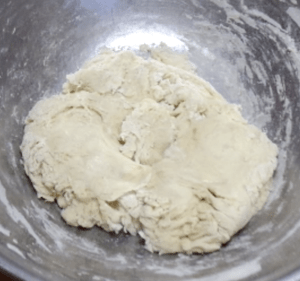 This gives the proteins time to fully unlock and knit together with many cross links before stretching and aligning them.
By the way, I’ve tested whether salt and yeast interfere with this process and I haven’t found that they do to any noticeable degree, salt is said to actually enhance gluten formation. So when I autolyse, I add all the ingredients to the water, blend well and then stir in the flour. I use the dome for this stage, it works better and faster than a spoon or a spatula and has its own blade section that does an excellent job of scraping all the flour into the mixture. It really gives a big stir with its wide capacity.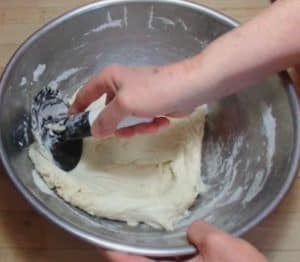
After the 15 minute rest period, I knead for a half minute with the dome, smearing the dough with it and turning the bowl and smearing again so the dough stretches and aligns the gluten strands in a radial network. You want to really stretch and spread the dough on the bottom of the bowl as if plastering the bowl.
This builds a very strong dough with many bonds, so strong that for many bread recipes, this is all the preparation activity you need to do. You autolyse, knead and just leave the dough to proof for a couple of hours or even more until you’re ready to shape it into a loaf. To do this, I scraped the dough out of the bowl onto a floured surface. Then I formed it into a ball by taking sections of dough and folding them over to the center until the dough is roughly spherical. Then I placed the dough in a banneton proofing basket that’s made for shaping bread dough.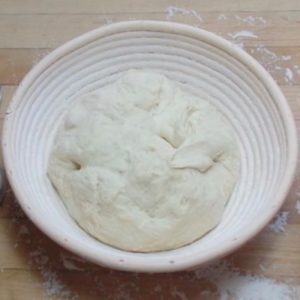 Using a banneton basket helps to mold the bread into a polished looking loaf.
And when I dispensed the dough from the banneton onto the baking sheet, it held up well and maintained good height. I didn’t slash the loaf to prevent it from cracking. I didn’t need to in this case, but slashing bread dough is generally a good practice that allows the dough to vent.
Stretch and Fold
I wanted to compare this sequence of autolysing/ kneading/ proofing with another few steps that I thought would improve the rising power even more. For this test, I added a stretch and fold two times during the proofing process. Stretching and folding is a way of stacking dough up higher and creates more opportunities for gluten bonds to form.
My autolysed/kneaded dough proofed for two hours before I placed it in the banneton. To test the addition of stretching and folding steps, I wanted to maintain this two hours of proofing to make the proofing time equal — and by the way, the room temperature of 70° F was equal as well.
 After the kneading step, I let the dough proof for 45 minutes, then did one stretch and fold session. I allowed it to proof another 30 minutes, then did a second stretch and fold session. Stretching and folding does de-gas the dough so I let it recover volume for 45 minutes before placing the dough in a banneton. Altogether, this was two hours of proofing before placing it in the banneton – the same amount as my test with the autolysed/kneaded dough. What was the result? Yes, adding stretching and folding did make a difference in dough strength and dough height. It held its shape better once dispensed from the banneton and baked up higher.
Different Methods of Making Bread
So I concluded that two stretch and folds are worth doing. However, adding these steps meant I had to stick around while the dough proofed for all the shorter 45 minute and 30 minute and 45 minute time intervals and set timers to remind me when it was time to pay attention to the dough. It’s not a lot more work, but is definitely less convenient.
So what do I think? My conclusion is that both of these approaches are useful. There are going to be days when it’s too inconvenient to add the stretch and fold steps, but that doesn’t mean I can’t make bread those days. The results of just autolysing and kneading are very good. I can make a decent loaf of bread this way and it’s so easy and convenient — especially if I use the dome, which allows me to work in a bowl and avoid a lot of counter cleanup. I can mix in a bowl, knead in a bowl, stretch and fold in a bowl and scrape the dough out of the bowl with my one convenient tool – the Dome. And those days when I have more time, I can do the full treatment: autolyse, knead, stretch and fold twice for an even better loaf.
My No Knead Bread Test
There was one more test I wanted to try with this same boule recipe to see if the simplest option, a no-knead loaf, could be made in the same time frame. I already knew that no-knead loaves came out well with long hours of proofing. If you just stir a well hydrated mixture of the ingredients, the gluten will naturally form into a strong network in about 24 hours. You don’t have to do anything else before shaping it in a banneton. But I wanted to see if it would be as good with only two hours of proofing. So I mixed the ingredients and let it proof for two hours. 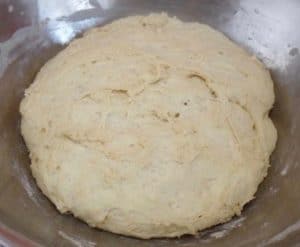 When I checked the dough after about an hour, it had risen, but looked different than kneaded dough. Its surface was more perforated with air holes than kneaded dough, as if the dough didn’t have the tensile strength to hold in the air. The picture to the left shows how it looked after two hours. I placed it in a banneton for the final rise. When I dispensed the dough from the banneton, there was a real difference. It stuck a little bit to the banneton. It spread out more on the baking sheet and lost height. It didn’t have the elasticity of kneaded bread. Nevertheless, it was still good to eat. Homemade bread is so very forgiving, as long as it isn’t dense and dry.
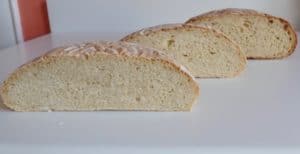
Following are some photographs for comparing my results.
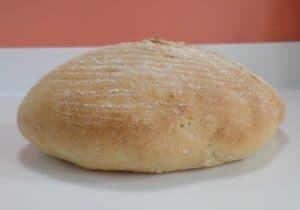
No knead loaf
Simple autolyse/knead
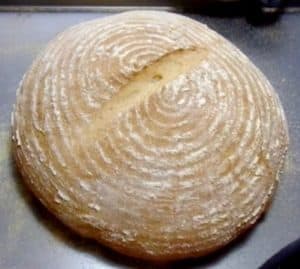
Autolyse/knead/stretch & fold
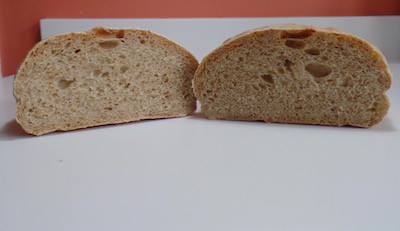
Simple autolyse/knead/ vs. Autolyse/knead/stetch & fold
No knead vs. Autolyse/knead vs. Autolyse/knead/stretch & fold
front to back
Shaping Dough With No Proofing Basket
Next in my explorations, I turned my attention to baking a boule without using a proofing basket or banneton for the final dough proving. In some ways a banneton makes shaping the loaf easier, but it does introduce some risk to the process. It can be tricky to transfer the loaf from the banneton to the baking pan or pot. Sometimes, the loaf deflates when it lands, especially if it has stuck to the basket in some way. Plus, how many people have bannetons in their kitchens — though they are inexpensive and easy to find online.
I decided I would test hand shaping for both my simple autolysed/kneaded loaf described earlier and another loaf to which I added two stretch and fold sessions also described above.
The Autolysed/Kneaded Bread
The simple autolysed/keaded dough was allowed to proof for about two hours and when it was ready to be shaped, I scraped the dough out of the bowl onto my floured surface. To form a bread loaf, I folded it into a ball, as with my other experiments, by taking sections of dough and folding them to the center until the dough was roughly spherical. 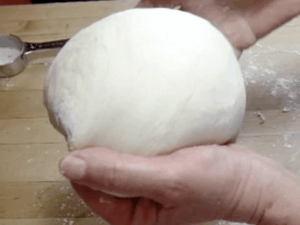 But instead of placing it in a banneton, I created surface tension on the top dough surface by tightening the dough.
I held the dough in both my hands with the top—smooth side—up and the gathered side down. Then with my hands, I began to gently pull the top surface dough underneath. This surface tightness acts much like the rubber membrane of a balloon that stays intact and expands with air as the bread bakes. I was hoping to get better oven spring, which is the additional rising that occurs from the heat of the oven. And with this method, I could let the dough ball do its final rise right on my baking pan, (on parchment paper or a dusting of cornmeal) so it could remain undisturbed while placing the pan in the oven to bake. This was a distinct advantage.
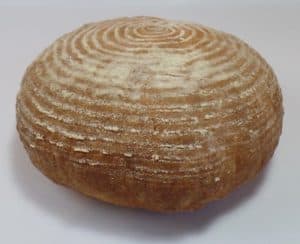
I was so surprised by the result. Creating that surface tension made a big difference. The oven spring added much more height and openness to the bread. I was delighted. The recipe for how to make this simple boule is on my Domestic Bliss blog.
Adding Stretch and Fold Steps
When I used this method of hand shaping on the recipe that adds two stretch and fold sessions, it also came out higher than the comparable loaf that proofed in a banneton. It maintained its shape very well and gained even more height in the oven. The recipe for how to make this classic boule is on my Domestic Bliss blog.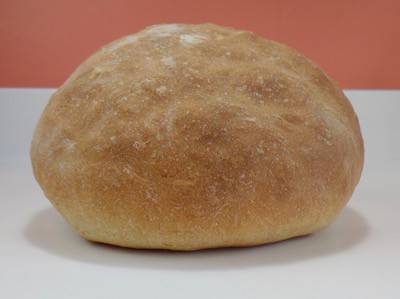
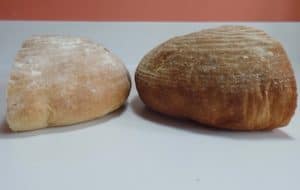
Below shows the two hand shaped loaves that were given the surface tension treatment side by side on a counter. The loaf on the right was autolysed and kneaded. The loaf on the left started out the same way, but underwent two stretch and fold sessions during the proofing. It held its height better, but was a little more inconvenient. Both were absolutely delicious.
Does Surface Tightening Work For Wetter Dough?
So this dough tightening to increase the surface strength and tension is a valuable technique to learn and practice. It’s not too difficult to learn, especially if the dough isn’t too wet. With stickier dough, it’s a little harder to do.
I made sourdough bread this way, which generally needs to be a pretty sticky dough in order to form those signature holes in the loaf. I found I could shape and tighten the loaf this way by using a little more flour on the dough and on my hands when I was forming the loaf. It baked up with good oven spring and was moist and holey without using a covered pan like a dutch oven. I didn’t have to transfer the fully proofed loaf to another pot. It did its final rise on a baking pan which I carried over to the oven and placed inside.
This wraps up my explorations into making great bread easily and conveniently through the enhancing of natural gluten formation. I think my results speak for themselves in the photographs of my lovely loaves. You can make these loaves yourself by watching the two instructional videos I made. How To Make A Simple Boule will show how to make a very good loaf in the most convenient and flexible way. Classic Country Boule adds the two stretch and fold turnings that make this loaf rise even higher. I hope you will try them to enjoy these delicious treats.
Next I’ll be onto enhancing the fermentation process. So check back again to follow my experiments on this second major process of bread making.
Click to Subscribe to this Blog.
Learn More About the Dome Dough Maker